
I must warn you guys before you decide to read this tutorial. There will be a lot of pictures involved here, so be prepared.

The materials:

- Your shabby jeans
- Fabric for lining
- Fabrics or the accent.
- fusible interfacing, lightweight is preferred
- 8 eyelets
- 1 cord lock 2 hole
- 2 triglides 3.2 cm
- 2 rectangle loops 3.2 cm
- Dacron/Batting*
- 30 mm button 1pcs
- * : Optional
note: You might find some differences between the photos and the explanation. In case if you noticed something different in the pic and in the explanation, we apologize for any inconvenience.
Step 1: Take apart
This is the jeans that I used. |
| Front |
 |
| Back |
1. Remove the back pocket, the belt loop, and other parts that you don't want to use or you want to keep. For this tutorial, I will take out the ornaments and the pockets.


Step 2: Cut
The size of your jeans will affect the final bag size. This time, I will make a medium-size backpack with measurement around L 37 x H 26 x D 14 cm.1. Main Backpack Part

Because the jeans that I used wasn't that long, I cut it 30cm from the top and added another fabric around 10cm on the bottom. If your jeans is long enough, you can cut it directly 38cm from top plus 1 cm for sewing allowance. Fold jeans, mark with tailor chalk.
2. Strap and Flap
Remaining of leg part of the jeans.
Use one part for the strap. Cut one leg into 4 parts so you can combine it and make a longer strap. In this tutorial, the length of the strap is 9 x 71 cm (after the combining). It's not long enough, but adequate. If you have longer remaining the leg part, you can make it to 9 x 117.

Now we will use the other part of the remaining leg for the flap. First, open one side of the leg seam. Then "straighten" the curvy areas by cutting it down.


Since I'm planning to make a rounded flap, fold back the leg into a half, then cut it into the shape of the photo below. You can make any shape you want (square, rectangle, rounded in the corner, etc). For this tutorial, the size of the remaining fabric for the flap is L 26 x H 25 cm. After the cut, the top smallest top part is 19,5 cm and the widest is 26 cm.


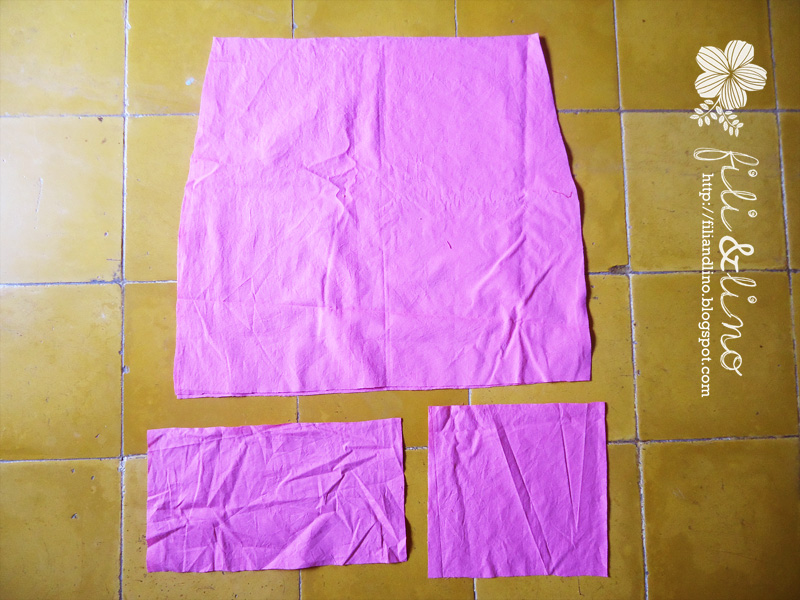
3. Add the accent

A) Fabric for the flap lining. Cut it according to the size of the flap
B) Fabric for the bottom part of the bag with size 28 x H 16 cm
C) Fabric to attach the rectangle loops with size 13 x 9 cm. Make 2
D) Fabric for pocket accent with size 14 x 7 cm. Make 2
E) Fabric for the closure string 40 x 3 cm. Make 2
F) Fabric for bag extension L 44 x H 10 cm
4. Lining
G) Lining for the main body 37 x 44 cm. Cut the lining according to the shape of the bag body, which is getting smaller to the top. Make 2
H) Lining for the bottom part of the bag, size 28 x 16 cm
I) Fabric for the inside pocket size 20 x 19 cm
J) Fabric for lining binding around 94 x 4.5 cm
Step 3: Sew
1. Backpack main part
Unseam the crotch area until near the zipper (front) or until the curvy line ended.


Flatten the fabric. Sew back the area that we just unseam. Sew it with thread that has similar color to the original color. Sew up to the zipper closure area.

 |
| Sew also the zipper closure |

The result

Cut the bottom part if it wasn't neat and straight enough, then sew it with the extension fabric (F). Sew the 10cm part of the fabric together. Meet the good side of the extension fabric with the good side of the jeans. Sew together.
 |
| Add some contrasting fabric for accent or if your jeans is not long enough |
To add the accent on the pocket, cut the top fabric until the original seam allowance.

Meet the good side of the pocket with the good side of the accent fabric (Fabric D). Sew around 1 cm from the top.
 |
| Sew on the bad side |
 |
| Fold the accent fabric over the pocket, so the accent fabric is covering the top part of the pocket |
 |
| Fold the unsewn part of the accent fabric around 0.5 cm. Top sew the accent fabric. |
Put the pocket around 4 cm above the bottom. the side of the body.

I also decided to put back the pocket. Of course, you can always leave the back pocket there from the beginning.

3.Flap
Meet the good side of the flap fabrics (the jeans and fabric A). Sew the top side.

Now turn the flap so the good sides are facing you. Prepare a bias binding with size around 70cm x 4.5 cm.

Sew the bias binding around the flap.

Now we're going to sew the fabric for the closure string (Fabric E). Fold both sides and meet them in the middle, then fold in half again. Sew. Sew also the open end.

Sew both threads to the back side of the waistband. Give space around 18cm between both.

Now sew the flap on the middle-back waistband, covering the end of the string that we just sew before. Leave it for a moment, we'll go back to the bag body after.

4. Strap
Sew two parts of cuts for strap into one like the photo below.

Fold into a half, sew.

Turn it over. You can use pencil/chopstick/bamboo skewer to do this.

Position the seam in the middle. Sew it like horizontally like photos below.

 |
| The result |

Now let's attach the triglides & rectangle loops to the straps. First, we put the triglides to the denim strap.


Put the end near to the rectangular loops back to the gap in the inside part of the triglides. If it sounds confusing, just see the photo below.

Sew the corner of the strap, then sew.

 |
| Front |
 |
| Back |
Now put fabric C inside the triangle loops. Sew the unsewn part to the flap. You can use the "hiding" technic to sew it. Put the strap with triangle loop position below the flap, with around 1 cm of strap overlap with the flap. Sew around 0.5 cm from the end of the strap. Then bring the strap to the top, covering the seam that we just sew.


Now sew the other side of the strap to the bottom of the body around 11-12 cm from the left/right sides. Sew it for a few times to make it strong (sorry, no photo for this step).
5. Button
Prepare a small fabric for the hook. Sew it like when we sew the closure string. Tied the end then sew it to the middle part of the flap.

Sew the button on the bag body

6. Lining
Sew the inside pocket (fabric I) to the lining (fabric G). Fold the to top part of fabric I, then sew it. Fold the remaining sides, then sew these side to the lining fabric.

Sew both sides of bag lining together. Meet the good sides together, then sew the left and right sides. Leave the bottom part open.
Now we are going to attach the lining to the bag. Fold the top part of the lining around 1cm to the bad side. Meet the lining of the body, with the position around under the jeans' button. Sew it by hand. If your sewing machine can sew it, then use a machine to sew.
 |
| Fold the lining a little bit on the jeans button area |

Now we are going to finish the bottom part of the bag.
Sandwich the dacron/batting between the bad sides of bottom fabrics (fabric B and H). Sew all the sides together.

Now we have to sew the bottom fabrics to the body. Mark the middle of bottom fabric with the middle of the body fabric. Meet, pin, sew.


Now cover this ugly area with a bias binding (fabric J).

7. Eyelets

If you have eyelets punch, that's good. But if you don't, just use the traditional hammer and pliers.
First, mark the part of the "waistband" where you want to put the eyelets. Give space around 5cm between eyelets. For the back part, place the eyelets around 2 cm on the right/left of the flap.
Make a hole by cut the fabric a little bit then use a screwdriver to make the hole bigger. Place the eyelets in the hole, then punch the "bad" side of the eyelets on the bad side of the waistband with a hammer. Be careful when you do this, and it is always safer to use some gloves, just in case.

Put the string, add the cord lock, then make a knot at the end of your string.

Aand, voila :)


Thank you for hang in there and finally finished reading this long tutorial post. We know that there are few steps that might be confusing and not really clear. Therefore, if you have any questions, please feel free to ask us.
Much love,
Fili&Lino
I adore your backpack! Thank you so much for this tutorial :-)
ReplyDeleteThank you for reading until the very end.
DeleteYou're welcome :D
That is very clever! Thanks for sharing!
ReplyDeleteNo worries. We're very happy to share the tutorial <3
DeleteI loved all the photos, it made the whole process very clear. Thanks for sharing.
ReplyDeleteThanks so much for this great tutorial. I know it takes much time to put all this online.
ReplyDeleteIt looks really nice and it's a good way to give a second life to old jeans, I hope I will find some
time to try eat.
tq for tutorial..
ReplyDeleteyou sholud make a video with this tut!! :D I liked it!
ReplyDeletePerfect timing. I was just at the thrift store this am and picked up a pair of jeans for .39. Now I know what I'm going to make with them. Thanks for the detailed tutorial. This is one of the cuter bags I've seen.
ReplyDeleteThanks for sharing :-)
ReplyDeleteWhere do u get the rectangle loops and triglides?
ReplyDeleteCould you hand sew this as well?
very nice thing iam use this
ReplyDeletemuito bom !
ReplyDeleteFelicitaciones! El mejor tutorial que he visto.......... Desde Argentina un beso........
ReplyDeleteI discovered your site last week, and decided to make that bag! So I followed your tuto steps by steps, and there it is! I finished it today!! Thank you so much for sharing!!
ReplyDeleteCatherine from France.
Hi Chaterine! Thanks a lot for your comment. We're happy to know that you did it! Amazing that you could understand our broken English XD
DeleteThank you for this tutorial! Gonna make this one! I LOve your work! =)
ReplyDeletepor favor ponga intruciones español aqui colombia cucuta norte santander , me gustraria para hacerme ,gracias dios bendiga
ReplyDeleteWow, I love your idea. You've made a pretty backpack.
ReplyDeleteThanks for sharing info. Keep up the good work...We hope you will visit our blog often as we discuss topics of interest to you
ReplyDeleteJeans Colombia
I wanted to thank you for this great read. Your blog is one of the finest blog . Thanks for posting this informative article.
ReplyDeleteM Rena Leggings
Do girls wear tight jeans to make guys look?
ReplyDeletewide leg jeans
I think most people would agree with your article. I am going to bookmark this web site so I can come back and read more articles. Keep up the good work!
ReplyDeletedupatta style
I visited your blog for the first time and just been your fan. I Will be back often to check up on new stuff you post!
ReplyDeletemugs
The blog article very surprised to me! Your writing is good. In this I learned a lot! Thank you!
ReplyDeletewomens t-shirts
This comment has been removed by the author.
ReplyDeleteI don't understand how to attach the bottom of the bag. Can anyone explain? Thanks.
ReplyDeleteThere is a lot of info on this blog: very helpful
ReplyDeletenatural bedding sets
Denim backpack is most popular day by day. Without a denim backpack we can not get pleasure in our journey. We need to collect secret information about new denim backpack. This blog help me lot to collect secret information about
ReplyDeletedenim backpack. Thanks for your nice post. I am waiting your next post.
This is sweet! I really like it! Thanks for the tutorial! :)
ReplyDeleteWOW!! What a gleaming thought presented in this post Denim Backpack Tutorial. We appreciate and will certainly try this, being a reliable School Backpack Manufacturers.
ReplyDeleteCan not see any of your photos is there a reason?
ReplyDeleteHello,sorry for the inconveniences, you can check out the tutorial at our website https://www.filiandlino.com/recycle-jeans-backpack
Deletecan you please give the exact measurements of the peices that you used plus the seam
ReplyDeletecan you please give the exact measurements of the peices that you used plus the seam
ReplyDeleteThat is very clever! Thanks for sharing!
ReplyDeletegraduation gifts 2020
anniversary gifts for him
european linen pillow
What size jeans did you use?
ReplyDelete